2014 Glasgow Commenwealth Games
DiPS has the facility to manually adjust road speed box factors, link changes
and postcode time restrictions. These can be
used anytime and can be used for the Commenwealth Games if you would
like to start preparing early.
Box factors can be drawn around
the Games sites to modify road speeds for specific
areas. Postcode restrictions override the ordinary delivery criteria
for a call by postcode, so every call in a postcode area will have
its times and vehicle access modified to the required criteria.
DiPS has created Macros that can
be easily loaded into DiPS before planning to set up box factors for
the affected areas in Glasgow.
Based upon the Commenwealth Games Transport Strategic Plan, three
main clusters of venues have been covered by road speed boxes -
East, West and South. (Click here to
download the PDF if requried)
Download the
Macros using this link and the follow the instructions below to
load them into your DiPS plans when required. The default settings
are for reductions of around 10-15% on normal road conditions
although these are configurable by users once loaded in the program.
These estimates are based upon the
demand figures compared to
annualised traffic flow as contained in the Transport Plan.
How to Load in DiPS Macros
1. Download the DiPS Macro to your computer and Run DiPS as normal
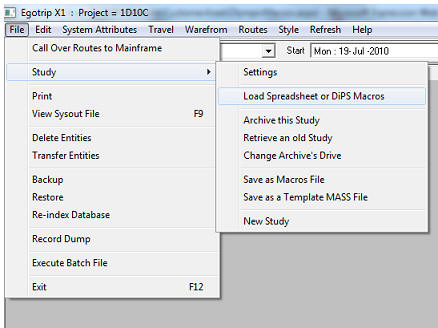
2. In DiPS, go to the File Menu, Click on Study then "Load
Spreadsheet or DiPS Macros"
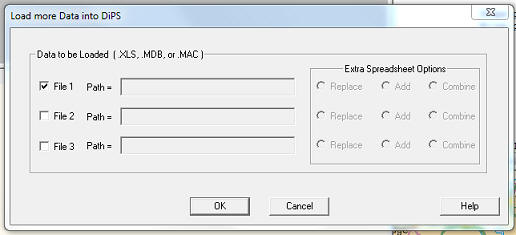
3. When the Dialog appears, Left click on the box next to "File
1" to tick it and bring up the Window to select the Macro you want
4. Go to the drop-down box next to File name at the bottom of
the window, and click on "Dips Macro Files(*.mac)
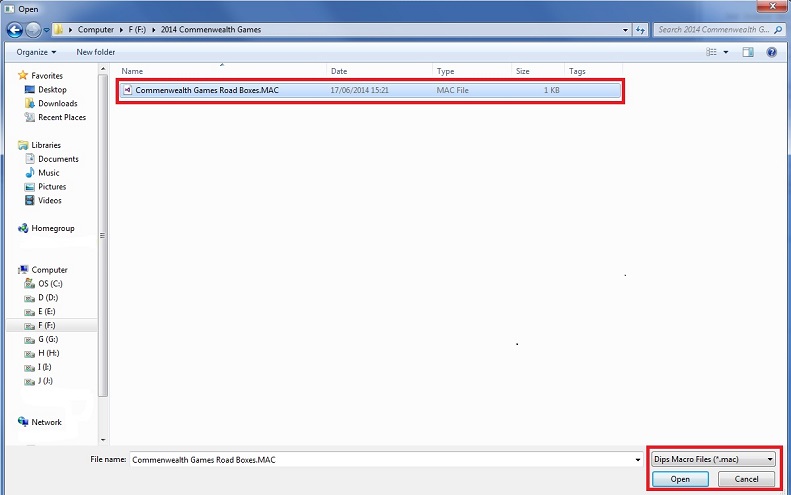
Find the Macro file Commenwealth Games Road Boxes, click on it once to
highlight it, then click on Open. Then click on OK.
DiPS will
load in the Macro file, inform you of any errors, and then you are
ready to go.
How to Delete Box Factors in
DiPS
To delete Box Factors from DiPS after the Games have closed -
1. Go to the Travel Menu and
click on Parameters
2. Click on the Box Factors tab
3. Click
on the number to the left of the box you wish to delete so it is
highlighted
4. Click Delete.
How Box Factors Work
All road speeds in a boxed area can be
increased or decreased using the Speed Factors facility. A factor of
120% will have the effect of increasing all road speeds by 20%;
factors less than 100% will have a negating effect.
Box areas may be established using mouse
or Latitude and Longitude. Where two boxes overlap the largest box
number value will apply (i.e.
box 2 further down the list
has priority over box 1).
Any areas not defined by a boxed grid
will use the default settings for road speeds. The boxed area factor
will have priority over default road settings but not over
any changes made to specific links using the Individual Road Link
Changes facility. A text description may also be applied to each
boxed area established using the field provided.
Box Factors may be applied to each Speed
Table defined (Default and A-Z), allowing further control on speeds
in the defined area by time of day or day of the week. Simply place
a tick by each speed table required.
To add box areas using the mouse to draw a rectangle , first draw a
pop-up window around the area in question on the graphics panel
using the LHB. Then after selecting Travel Parameters, Box Factors,
click on the Draw New Box on Map button. To create a
new Speed Box, click on the New button to display the input screen
for a box, type the appropriate values into the fields provided and
then click on the OK button. To clear any existing values click on
the relevant # no. and click on Delete. To change an existing box
select it by clicking on the required No. in # column and modify the
values before clicking on the OK button. To move a Box, simply
select it and then click on the Move Up or Move Down button. To send
a copy of the settings to the default printer use the Print button.
1.
Draw a box on the bottom right map to bring up a pop-up drawing of
the area you want to place your Box.
2.
Go the Travel menu, then click on Parameters
3.
On the Properties Dialog that appears, click on “Draw New Box on
Map”
4.
Now draw a box on the pop-up where you want your box to be
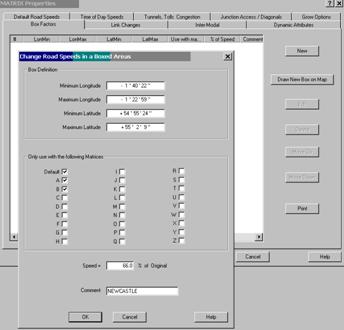
5.
A Pop-up dialog will appear to select Matricies and allow you to
enter a speed as a percentage of Original:
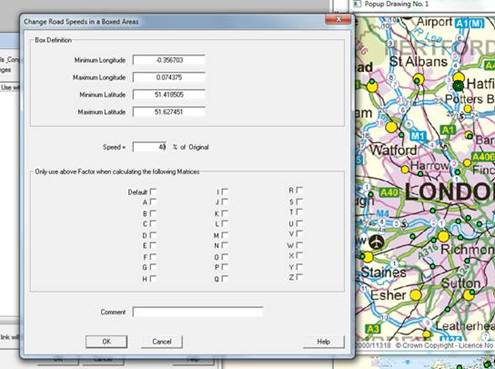
Once you click OK in both dialogs, DiPS will then re-run the matrix
to recalculate all the speeds and times
Link Changes
It is possible to restrict the speed on
any particular road section on the roadfile database by using the
Individual Road Link Changes to modify the relevant base value set
in either Road Speeds, Special Classes of Road, or Road Speed
Factors by Boxed Area parameters. This facility is intended to cope
with everyday problems such as long-term roadworks, traffic queues,
or toll road links.
 Modify
Link Changes using Graphics Screen
Modify
Link Changes using Graphics Screen
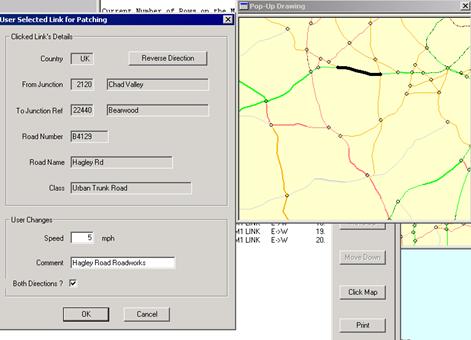
To add link changes using the Highway
Mode graphics screen to highlight links, first draw a pop-up window
around the area in question using the LHB. Then after selecting
Travel Parameters, Link Changes, click on the New - Click Map
button. The graphics window will then re-draw displaying junction
circles. To select a link, click on the link required using the LHB
and the dialog box will appear as indicated. The dialog will display
the link including junction points and road information. Input the
Changes as required (set the speed = 0 to disable the link) and set
the both directions indicator. Click Ok to save changes or Cancel to
choose another link from the map if the current selection is not
correct.
To clear any existing values click on the
relevant # no. and click on Delete. To change an existing link
select it by clicking on the required No. in # column and modify the
values before clicking on the OK button. To move a link in the list,
simply select it and then click on the Move Up or Move Down button.
To send a copy of the settings to the default printer use the Print
button.
Certain links will appear in this section
for every new study as part of the set-up phase. These links include
the Humber, Severn, Tamar and
Forth bridges and the Dartford Tunnel/Bridge. Speeds for
these will be set by default at 20 mph, and will over-ride any
constraints set in any of the sections discussed above.
It is useful to note that any restriction
place between two junctions will only apply in that direction. For
the restriction to be effective in both directions two lines must be
set up - one with the A ->
B direction and the
other with the B -> A
direction.
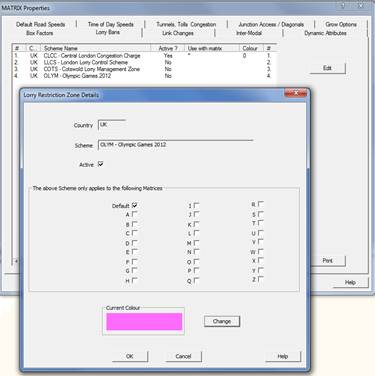
Booked Time Codes and Postcode Restrictions
DiPS has the facility to set default
opening times and vehicle restrictions based on postcode wildcards.
To do this simply go to the Edit menu click on
Default Restrictions
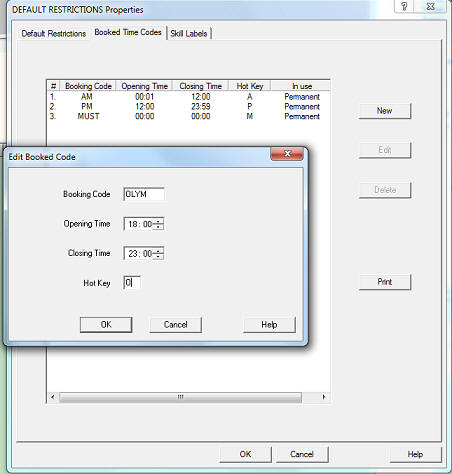
Then click on the
Booked Time Codes, then New
You can now
add a code such as 'GAME' and set the opening and closing times, add
a hot key, e.g. 'O'.
Click OK and the time code
is ready to be used.
Next, Go to Routes Menu -> Parameters ->
Postcode to Restrictions
Click New, to add a Postcode wildcard
e.g. G20???????? where '?' means it can be any number or letter
You can restrict it to certain days, set maximum vehicle and select
the Time Band to use.
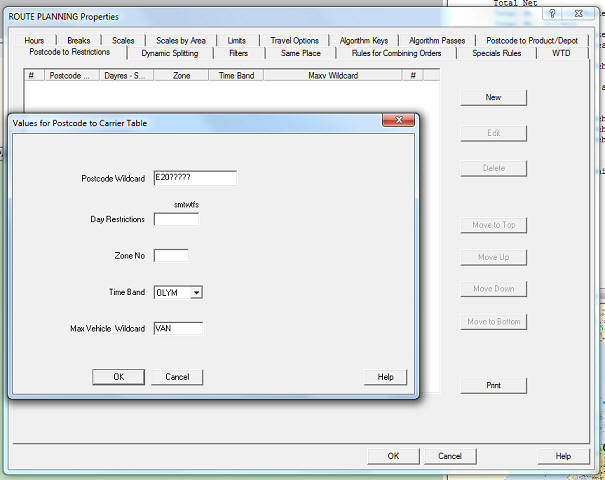
This will now overwrite the default times and
Max Vehicle size for any orders with a postcode beginning with E20
for example
Go to Style-> Deferred Headings -> add BookT,
this will show 'GAME' for any orders affected